Sunday, October 13, 2013

meal in a pumpkin

one of my favorite things to cook in the fall! meal-in-a-pumpkin
be forewarned, after halloween all the grocery stores throw away their pumpkins and the pumpkin patches are basically cleaned out by then. so plan accordingly. 

you want a pumpkin for eating, not carving. sometimes the pumpkins are labeled as such. 

you want a pumpkin thats 'medium sized'. what does that mean? god only knows. 
basically it needs to be small enough to fit in your oven, 
but big enough to get a large skillet of meat/veggies in it. 

heres what i love about this recipe: there isnt really one! 
you can make it however youd like with whatever veggies/meat* you like! 
if you google it, you will find lots of recipes that are simple and kinda boring. 

heres the basic 'how to':

1 medium pumpkin
1.25-1.5 lbs ground meat
veggies - water chestnuts
soy sauce
olive oil
brwn sugar/honey
seasonings/spices
yogurt or broth
rice/quinoa

1. cut a hole in the top of the pumpkin. this becomes your lid. best to cut it an an angle \  / cuz as the squash bakes it will shrink and your lid might fall right into the middle if you have cut it straight |  | .
scoop out the innards. do what you wish with the seeds.
place the pumpkin in a pot or wide baking dish, cuz its really hard to pull it out of the oven when its done and soft.

2. brown meat of choice in a large skillet. i like turkey. add seasonings of choice.
today i used a garam masala blend i bought in india. its sweet with a hint of savory.

3. add your veggies to the meat. today i used: yellow beets, turnip, kalamata olives, garlic, asparagus, mushrooms, bamboo shoots and spinach.
grnd turkey with turnip, bamboo, yellow beets, garlic

i was excited to be able to use some of my thrive foods! +
i decided against the carrots, since i was using turnips. and i decided to use my beet greens in a different dish.
my thrive foods - chopped spinach, mushrooms and cut asparagus


other veggie suggestions: onions, celery, carrots, bell peppers, red beets, rutabaga, black olives, brussel sprouts, broccoli, cauliflower, jalapeno. GET CREATIVE!
the water chestnuts add a nice crunch. i decided plenty of my veggies were al dante enough to not warrant adding the water chestnuts today.

if you start your onions and garlic in butter before adding the meat, they will be that much more delish.

dont forget to add addtl seasonings/spices to your skillet now that the veggies are in there too. i added crushed red pepper flakes to add some pazazz to my sweeter garam masala spices.
gorgeous! 

4. add olive oil and soy sauce. how ever many splashes you want to. compliment the seasonings/spices you put in the skillet. go light with the soy if you already added a lot of salt.
add the sweet - the brown sugar/honey. again to compliment your flavors of veggies.

5. the original recipes for this concoction of pumpkin delight calls for a can of campbells cream of something soup. BARF right!?
so i usually use chicken or beef broth.
today i decided to try using my homemade almond milk yogurt.
FANTASTIC! it added just enough creamy to my meat/veggies but didn't leave a sloshy soupy mess in its wake.
i used several heaping scoops of yogurt.

6. scoop everything from the skillet into your cleaned out pumpkin. place lid on top and place in the oven on the 2nd to last rack.

7. bake at 350'F for about an hour, until the squash forks easily. check it at about 45 mins. today mine cooked for 1 hr 10 mins.


8. scoop out the inside of the pumpkin being sure to scoop out the cooked squash with the rest of the yumminess.
note - even though your meat/veggie mix doesnt fill the pumpkin, it will yield A LOT of food!


this particular pumpkin flesh resembles spaghetti squash and has a nice al dante texture

9. serve on rice or quinoa. add any addtl seasonings if needed.

*leave out the meat for a vegetarian meal.
+interested in the thrive products, learning more about how the system works and why you would benefit greatly? contact Natalie at tatymsmammy at gmail dot com


Monday, September 2, 2013

EASY almond milk and yogurt

if you read my blueberry gummie recipe then you will recall that laziness motivates much of my cooking adventures. btw- this all started because i was disgusted that one tiny lil almond milk yogurt cup from the healthy section of the grocery store had 17 g of sugar in it and cost almost $2.00

so i scoured the interwebs for the easiest, least ingredients, recipe for almond milk yogurt. and then because im incapable of actually following a recipe, i created my own, exact measurements below are my best guess, as i tend to pour and dash and toss, and then add some more ;) 
SO SO delish, and thats all that matters. 


~I do this at night. 
~I recommend making your first batch with JUST honey – no other sweetener or flavoring, so as not to waste if it doesn't turn out. There is always a learning curve involved.
~Be forewarned, the milk is not going to taste like the super sweet stuff you buy in a box. If its not sweet enough for you, add a titch of raw sugar cane, honey, maple syrup or vanilla as needed to your milk in the blending phase.

Milk: 
ingredients: raw almonds. water. yes thats it. 

3 cups of raw almonds. 
Soak on countertop for 24 hrs. don't soak in the fridge. Add more water to soaking bowl as needed.
rinse almonds very well in fresh water. Drain.
blend soaked almonds with 2:1 fresh water.
           ie 1 cup of now soaked almonds with 2 cups water.
               if you have a food processor or vitamix... shhh i dont wanna hear it. 
Strain with cheese cloth into storage container/juice pitcher. 
              lets talk abt this for a minute. im going to assume youre like me and not familiar with straining and milking things. i mean, why would you be when you can buy everything you need strained and milked off the shelf?! #firstworldproblems #hollyhomemaker
heres what i did. btw i got faster and faster at it and soon it was no big deal. at first it was more of a 'how the heck' type of situation. 
so.... i cut a large enough piece of cheesecloth to fit over the top of the juice pitcher with enough hanging off the sides, while still allowing a little bit to slack into the pitcher that i would fill the slack with the blender concoction, and then bundle the extra cloth up and twist around the top of my almond bulge and squeeze the bulge with my CLEAN hands into the pitcher. make sense? youll get good at knowing how much to pour into the cloth before needing to grab it from overflowing pretty quick like. 
dry out leftover almond meal in the oven on a baking sheet on 350’ or less until dry 
         (a couple hours depending on the temp of the oven) check and stir it periodically
          to make sure moisture is escaping and its not burning, may as well bake a gf/df cake at the same
          time since this is like the epitome of domestic behavior 
bag and store in freezer if not going to use right away. 
            google all the wonderful things you can do with almond meal. 

milk can be in fridge for 3-5 days before spoiling. It will separate- Stir well before using.
** this quantity will provide enough for a batch of  yogurt and a bit leftover for drinking, cereal usage, etc. if you don't want that much, use less almonds to begin with. If you want creamer milk, use less fresh water in the blender. If you want thinner milk, use more fresh water in the blender. **

Tip: Can freeze leftover milk in ice cube tray for easy usage in smoothies
Another tip: in true laziness i figured out that putting the meal in a bowl was quite dumb, just dump the meal right onto your cookie sheet for oven drying. duh! 

viola! all the parts - blender, milk, cheesecloth, meal, more almonds waiting to become milk and meal

its so beautiful. brings a tear to my eye

Yogurt:
-4 cups almond milk (that you made 1 or 2 days prior) 
-Honey 
-Vanilla if desired (3 tblspns)
-Grassfed beef gelatin (great lakes) 1-2 tblspsns, depending on how stiff you want your
yogurt. I like 1.5 tblspns= not too runny and not super thick like flan dessert. Nothing wrong with flan, sometimes a hearty thick yogurt is superb, and its easier for kids to get it from their spoon to their mouth.
-Lemon zest/oil if desired. 5 -10 drops essential oil. (or orange, or other ‘flavor’) i use doterra oils
-Culture start. Plain yogurt with LIVE bacteria. 3 tblpsns. I use goat milk yogurt or greek brand plain
            yogurt bc im not completely cow milk intolerant, and I am not a proponent of soy.
-Crock pot. Hand towel. Bath towel.

1. heat milk to 180’ on stove top. Don't let boil, stir frequently. 
Meanwhile:
1. Blossom gelatin in abt 1/3-1/2 cup almond milk, use just enough milk to blossom all the powder.
2. Turn crockpot onto low, close lid.
2. add blossomed gelatin to pot of milk. Mix with hand blender to avoid clumps.

3. cool milk to 90’. This can take a bit of time. Stir often. Do not put in fridge. Putting on a different surface will help cool faster ie countertop 

4. while cooling - Add sweetener of choice ie honey. 3-4 tblspns.
also add vanilla or essential oil - lemon, lime, grapefruit, lavender, orange or fruit puree etc. 
mix with hand blender for equal distribution.

5. Once cooled: add culture- Don't want to kill the beneficial bacteria with the heat. 
Mix with hand blender.

6. Do a lil lick test to ensure no other flavor modifications are needed

7. pour into crockpot. Cover top with ceran wrap. Cover that with a hand towel. Place lid on top of ceran/towel. Turn it off. Wrap the bath towel around the crockpot. Can heat up towel in the dryer just prior if desired so its warm and cozy. 
Let it incubate. whaaa?? yes. and dont think that turning the crock pot back on 'for just a few minutes' after a few hours passes is a good idea. cuz its not. just trust me. 

8. after 12-18 hours, ie the next morning, pour liquid from crockpot into storage container and place in fridge. Should have ready-to-eat yogurt in a couple of hours or less.

yeilds: one of those tall yogurt tubs that doesnt fit on half your shelves in the fridge, however many ounces that is.

remember: save a few tblspns at the end of the batch to use as the next starter. 

sorry, no yogurt pics, i inhaled it too fast. 


Saturday, July 27, 2013

blueberry gummies - a healthy treat!

i tried out this recipe. it was ok, but i wasnt satisfied, i tried again with some tweaks, it was better, and people i shared the gummies with raved, but i still wasnt completely satisfied.
i didnt like the flavor to gelatin ratio.
so i changed it a bit more. below is my 'ok now im satisfied' recipe.
and i had 10 lbs of blueberries to do something with, so... 

note: feel free to split the recipe in half, or quarters even, depending on how much yield you want. they dont last for too long since they are preservative free. this recipe will need to stay in the fridge. (the finished product freezes beautifully)

i do everything in one pot, cuz im lazy and dont want tons of dishes to clean.

you can use any type of berry, but i didnt like the idea of seeds in my gummies and i really didnt like the idea of straining out seeds from my liquid concoction. that lazy thing again. 

Blueberry gummies:

5 C blueberries- fresh or frozen. 
1/2 C fresh squeezed lemon juice about 2 large lemons
3 1/4 C organic apple juice
3/4 cup + 1 tblspn raw local honey aka 13 tablespoons
7 drops of bergamot essential oil
5 drops of wild orange essential oil
6 drops of lemon essential oil
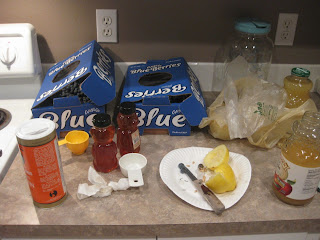
the ingredient stash
tastes like fresh squeezed apple juice
local and raw = legit health benefits
bought mine on amazon
1. pour juice and berries into large sauce pan. with the lid on bring to med-high heat, and reduce heat to keep it at a simmer, to break down the berries. stir occasionally. 
leave lid on when not stirring so all your liquid doesnt evaporate.

antioxidant much?! ;)  
very first batch, at the very beginning of the heating process

disintegrating into liquid, and smelling divine

so gloriously nutritious

the steam makes the pics unfocusy
2. use an immersion hand blender (or blender apparatus of choice) to turn berries into liquid smithereens. 

3. add honey and stir until completely dissolved. 
rub a thin layer of olive oil around the inside of your measuring cup/spoon with your finger and all the honey will slide right out into the pot
blend again if needed until completely liquid. 

4. make flavor adjustments. 
a quick lick of the liquid will tell you if you prefer more honey, more juice, etc. 
(keep in mind you havent added the citrus oils yet) 

5. add the essential oils. i use doTERRA essential oils
stir.
note: if you dont have any essential oils you can change your lemon:apple juice ratio --> more lemon, less apple. you can also do lemon + orange juice, and less apple... just as long as the total amt of liquid juice remains the same.

6. blossom the gelatin in enough apple juice to blossom all the powder, in a small bowl. 
keep on your desired level of heat and add the blossomed gelatin to the pot. blend.
immersion blender does a good job of turning it all into liquid smithereens. 

7. when completely liquid, pour into a 9x13 glass pan. 
put in refrigerator until solid. 
if making a smaller batch you can use an 8x8 glass pan.
it has to be glass or you will never get the stuff out of the pan. 
my very first batch in an 8x8


8. once solid, use a sharp knife to cut in to squares, size of your liking. use a metal blade cake/pie slicer/spatula to remove the gummies. 
they should come out easy peasy with minor sticking to the perimeter edge.

9. eat. 
share if youd like. 

10. store in fridge. 
the longer they sit out on the counter top, the warmer they will get and the gelatin will not be as firm. they wont melt into liquid, they just get 'less solid'. they freeze nicely too.